Plan Changes
Role required: change_manager.
Changes must be planned and scheduled carefully. Planning and scheduling a change helps minimize the disruption of vital IT services, as well as lower operational risks.
To plan a change in SimpleOne ITSM, you can:
- create a change schedule;
- break down the work on implementing a change into phases with added tasks;
- export the change work plan to a PDF file;
- prepare a change announcement.
When planning a change request, remember about time overlaps. Minimize the effect caused to the multiple services or CIs during the implementation.
Schedule a change request
To schedule a change request, complete the following steps:
- Navigate to Change Enablement → All Change Requests and open the change request you need.
- On the Schedule tab, enter the date and time for the request to start and finish processing into the appropriate fields.
- After the request was processed, enter the actual date and time.
Schedule tab fields
| Field | Mandatory* | Description |
|---|---|---|
| Planned start datetime | Y/N | Pick a date and time to start the request processing. Fill in this field before the change request can be processed. A change request's Planned start datetime must not be later than the Planned start datetime of its related tasks, excluding the tasks in the Preparation phase and canceled tasks. |
| Planned end datetime | Y/N | Pick a date and time to finish the request processing. Fill in this field before the change request can be processed. A change request's Planned end datetime must not be earlier than the Planned end datetime of its related tasks, excluding canceled tasks. Learn about automatic state transitions for overdue requests in the Change Types and State Models article. |
| Change schedule | Y/N | See the Change Schedule article. |
| Planned downtime | Y/N | If a service downtime is expected, specify its duration. The responsible person must fill in this field before the change request can be processed. |
| Downtime notes | Y/N | Add any notes about the planned service downtime. Fill in this field before the change request can be processed. |
| Announcement required | N | Select the checkbox if the change requires publishing an announcement. The field can be edited by:
The field is not available for editing if the Announcement published checkbox is selected. |
| Announcement published | N | The checkbox is selected automatically if the Service Announcement (announcement) table contains a record in the Published state in which the current change request is specified in the Related change request field. The checkbox is cleared automatically if:
The field is hidden on the form and can be edited only by users with the admin role. |
| Possible conflicting changes | Y/N | Contains change requests that have a time overlap with this request. It possibly can impact request implementation. This field is populated automatically. |
| Actual start datetime | Y/N | Pick a date and time for the actual start of the request processing. |
| Actual end datetime | Y/N | Pick a date and time for the actual finish of the request processing. |
| Actual downtime | Y/N | If the service downtime occurs, specify its duration. This field is mandatory if the Planned downtime field is filled in, and the state of the change request is Completed. |
* Whether the field is mandatory depends on the state of the change request.
Plan a change by phases
To plan a change request by phases, complete the following steps:
- Navigate to Change Enablement → All Change Requests and open the change request you need.
- On the Planning tab, describe the work plan for the phases.
- Create the necessary tasks.
- (optional) You can add created tasks into chains within a phase.
Planning phases
| Phase | Mandatory* | Description |
|---|---|---|
| Preparation | Y/N | This plan specifies the steps that need to be done and the criteria to be met before implementing the change. |
| Core activities | Y/N | Describe the process of change implementation. |
| Validation | Y/N | The process of how the change must be tested after the implementation. |
| Rollback | Y/N | The plan specifies the processes that roll back the system, service, or CI condition to its previous state in case of a failed implementation. |
* Whether the field is mandatory depends on the state of the change request and it repeats the behavior of the fields in earlier versions of the application. For example, when the state of the change request changes from Registered, the Work plan description fields become mandatory, tasks and chains in phases become read-only.
To track the process, each phase has a counter that displays the number of tasks completed and the total number of tasks in a particular phase. And in the right corner of the phase a badge is displayed that demonstrates the state of the work in the phase:
- When the change request and its tasks are In progress, the badge displays In progress. Until all tasks in the phases are completed, the state of the change request cannot be changed.
- Once all phase tasks are completed, the badge displays Completed.
The users assigned to the tasks in the Registered state are sent a notification to start working on the tasks when the related change request moves into the corresponding state:
- Scheduled – for tasks in the Preparation phase,
- In progress – for tasks in other phases, as well as the Preparation phase if the request moved from the Registered state directly into the In progress state.
Create change tasks
change_manager can add tasks in all the states of the change request except Authorization, Completed, and Closed.
You can create tasks as you work on change request planning phases. To do so, complete the following steps:
- Navigate to Change Enablement → All Change Requests and open the change request you need to work on.
- Open the Planning section.
- Click Add task and fill in the form. At this step, you can create a task chain by filling in the Previous task and Next task fields.
- Click Save.
- Repeat steps 1–3 to create the tasks in different phases.
You can also create change tasks via the Tasks related list on the change request form. To do so, complete the following steps:
- Navigate to Change Enablement → All Change Requests and open the change request you need to work on.
- Open the Tasks tab in the Related Lists area.
- Click New and fill in the form.
- Specify the start and end dates for the task implementation on the Schedule tab.
- Click Save or Save and exit.
You can create as many change tasks as you need.
Each task in a planning phase has a context menu that allows you to:
- Add the task to the chain.
- Remove the task from the chain.
- Move the task to another phase.
- Cancel the task. When the task is canceled, it is moved to Canceled tasks, a separate group outside the phases. When the task returns back into a phase, the task state is set to Draft.
To view brief information about the task, click . You can also search through the list of tasks for different phases.
Change task form fields
General
| Field | Mandatory | Description |
|---|---|---|
| Number | Y | This field contains a change request task number in the CHTXXXXXXX format and is populated automatically. |
| Change request | Y | Specify the change request for which you need to create a task. This field is populated automatically when you create a change task from the related list on the change request form. |
| Phase | Y | Specify the change phase depending on its schedule. |
| Type | N | Define the type of the change task. Available options:
The task type can be customized based on business needs (for example, Deployment task, Code review task, Documentation task). |
| Subject | Y | Specify the task subject. |
| Description | N | Add a detailed description of the task. |
| Followers list | N | Specify the users to receive notifications, when:
The users will not receive notifications when a user Follows or Unfollows the record on their own using a corresponding UI action on the form. The field is read-only when the record is in the Canceled or Closed state. |
| State | Y | Specify the task state. Available options:
The Draft state is displayed when the related change request is in the Registered state. The Waiting for change authorization state is displayed when the related change request is in the Registered state and waiting for the CAB approval (state is Authorization). Once the change request is authorized, the task state changes to To do. If the related change request is completed with the Implemented or Partially implemented closure code, and its tasks in all phases except for Rollback are in the Completed or Canceled state, the Rollback tasks are automatically moved into the Canceled state once the change request is saved. If the task is moved to the Canceled state, the user responsible for the parent change request receives an email notification about it. The Closed state is set automatically when the parent change request moves to the Closed state. |
| Assignment group | Y | Select a group to assign the task to. When a change request task is assigned to a responsible group, the Assigned user field becomes non-mandatory. See the Auto Assignment article to learn more about the dependency between the Assigned user and Assignment group fields. |
| Assigned user | Y | Select an employee to assign the task to. When a change request task is assigned to a responsible person, the Assignment group field becomes non-mandatory. See the Auto Assignment article to learn more about the dependency between the Assigned user and Assignment group fields. |
| On hold | N | Select the checkbox to show that the work on the task is paused. |
| Plan is ready | N | Select this checkbox to notify the user responsible for the parent change request that the change task plan is ready. This checkbox is active only for change tasks in the Registered state. When all change tasks related to the parent change request are saved with this checkbox selected, the user responsible for the parent change request receives an email notification that all of the change task plans are ready, and the authorization is required. |
Notes
| Field | Mandatory | Description |
|---|---|---|
| Activity Feed | N | Add work notes. The field becomes mandatory when
|
Schedule
| Field | Mandatory | Description |
|---|---|---|
| Planned start datetime | N | Specify the date and time when the assigned user is supposed to start working on this task. Except for tasks in the Preparation phase and canceled tasks, a task's Planned start datetime must not be earlier than the Planned start datetime of the related change request. |
| Planned end datetime | N | Specify the latest acceptable date and time when the task should move to the Completed or Closed state. The specified date must be later than the task's Planned start datetime, but no later than the Planned end datetime of the related change request. This rule does not apply to canceled tasks. |
| Previous task | N | The task that was done before this one. The task chain is created if specified. |
| Actual start datetime | N | The date when the assigned user started working on this task. The agent should fill in this field. |
| Actual end datetime | N | The date when the assigned user finished working on this task. The agent should fill in this field. |
| Next task | N | A task that should be done after the completion of this task. The task chain is created if specified. |
The Follow / Unfollow UI actions are available on the form. If you click Follow, you will be added to the Followers list and start receiving notifications. If you click Unfollow, you will stop receiving notifications about the changes in the record.
Access to the form fields
The read or update access to certain fields of a record can vary depending on the current user's roles.
- The users with the ITSM_agent or change_manager roles, other than the creator of the change task or the assigned user, can:
- View the record.
- Submit Work notes in all states of the change task other than Closed.
- Edit the Followers list field value.
- The users with the change_manager role can:
- Edit the State, Assignment group, and Assigned user field values in all states of the task except Waiting for change authorization and Closed. The Work notes field becomes mandatory in this case.
- The users with the ITSM_agent role who are assigned to the task or the member of the assigned group can:
- Edit the Change task field values of the task when the related change request is in the Registered state. In other states, only the Work notes field is available.
- The caller can:
- View the record, except for the Work notes field.
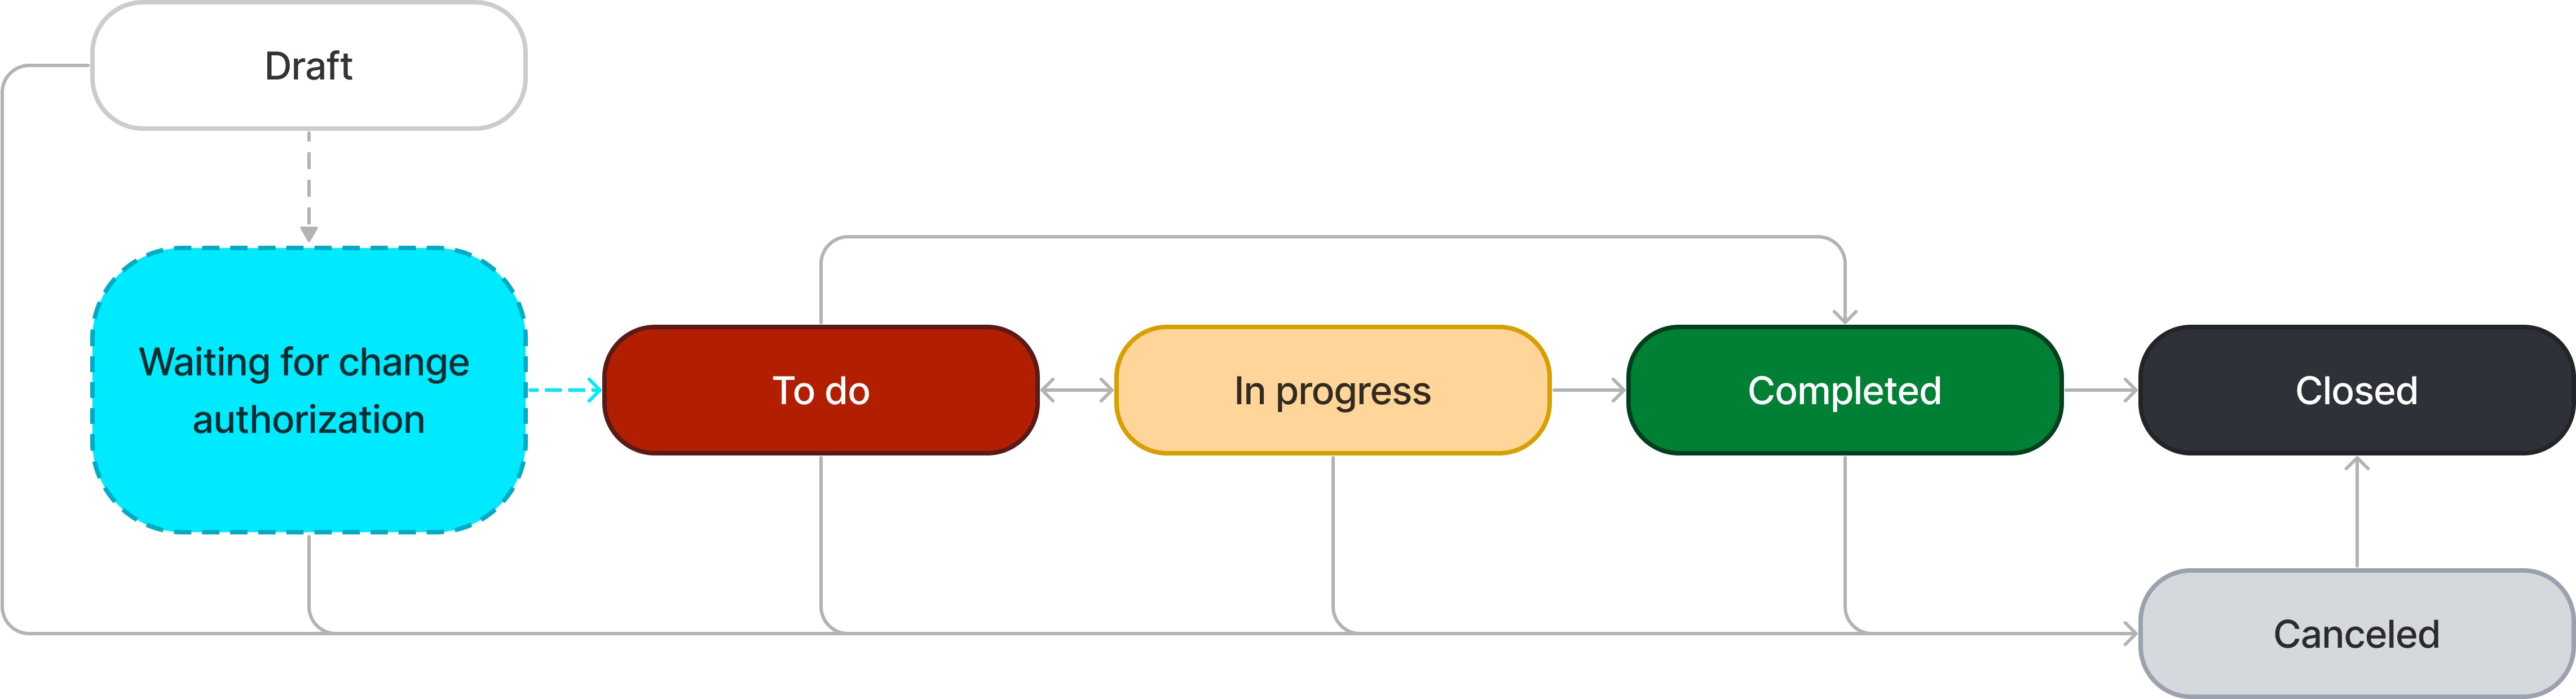
Change task state model
Standard change / Normal change

Normal change (change authority != Local authorization) / Emergency change
Create a task chain
Organize your work with change requests using chains. Chains in phases are numbered sequentially and they can be moved between phases like tasks. To move a chain to other phase, use the action.
To create a chain, complete the following steps:
- In the context menu of a task, select Add to chain.
- In the modal window that appears, specify the Previous and/or Next task.
- Click Apply to save the changes.
When canceling or moving a task from a chain:
- the tasks that were previously associated with it are connected to each other if there are two or more tasks left in the chain.
- the chain is disconnected if there is only one task left in the chain.
The tasks that are not included in chains are stored in Other tasks, a separate group of the corresponding phase.
Export a change work plan
You can export a change work plan to a PDF file to always have it at hand. This allows you to implement the change even if you are offline and the system is inaccessible.
To export the change work plan, complete the following steps:
- Navigate to Change Enablement → All Change Requests.
- Open the change request whose work plan you need to export.
- In the burger menu , click Export to PDF.
The generated file contains the listed fields of the change request and its tasks, provided that these fields are completed.
Change request and change task fields included in the file
- Number and Subject of the request,
- Assigned user and their Mobile phone,
- Service,
- Change type,
- Risk,
- Planned start datetime and Planned end datetime with the Timezone of the user who exported the plan,
- Planned downtime,
- Downtime notes,
- information on the related configuration items (CIs): their Display name, Location, as well as the CI Owner and their Mobile phone,
- Work plan description for the Preparation, Core activities, Validation, and Rollback planning phases,
- information on the tasks grouped by planning phases: their Number, Subject, Description, Assigned user and their Mobile number, as well as the tasks' Planned start datetime and Planned end datetime.
Create a change request announcement
Announcements help inform users about changes.
If an announcement is needed to communicate the change, select the Announcement required checkbox on the change request form.
To create an announcement about the change, complete the following steps:
- Navigate to Change Enablement → All Change Requests.
- Open the change request you need to create an announcement for.
- Click Create announcement in the upper-right corner of the form.
- Fill in the announcement fields.
- Click Save or Save and exit to apply the changes.
You can create as many announcements as you need.
As a result, a new announcement is created in the Service Announcement (announcement) table. It has the reference to the related change request. The announcement record is also displayed in the Service Announcement related list on the change request form.
Once the related announcement moves into the Published state, the Announcement published checkbox gets automatically selected on the change request form.