Create Records Related to Incidents
Role required: incident_manager.
Create relationships
You can create relationships between incidents and other types of records.
To create a relationship, complete the following steps:
- Navigate to Incident Management → All Incidents and open the incident you need.
- Open the Related Records tab.
- Click the magnifier icon next to the appropriate field.
- In the window that appears, choose the necessary option.
- Click Save to apply the changes.
Relationship types
| Type | Description |
|---|---|
| Related problems | The incident is related to the problems specified. For a child incident, the Related Problems field is automatically filled in with the value of the same field from the parent incident. It can only be edited by the users with the admin role. |
| Related user query | The incident is related to the user query specified. |
| Solved by changes | The incident is solved or can be solved by the change request specified. For a child incident, the Solved by Changes field is automatically filled in with the value of the same field from the parent incident. It can only be edited by the users with the admin role. |
| Caused by changes | The incident is caused by the change request specified. For a child incident, the Caused by Changes field is automatically filled in with the value of the same field from the parent incident. It can only be edited by the users with the admin role. |
| Level of dependency | The field is displayed on the form and automatically filled in when either the Parent Incident or the Child Incidents field is filled in. Possible values:
|
| Parent incident | The incident has a parent incident. Learn more in the Create Relationships Between Incidents article. |
| Child incidents | The incident has one or more child incidents. Learn more in the Create Relationships Between Incidents article. |
| Child incident count | If the current incident has child incidents, the field is automatically filled in with their number. Learn more in the Create Relationships Between Incidents article. |
| Related articles | The incident is related to the Knowledge Base article specified. For a child incident, the Related Articles field is automatically filled in with the value of the same field from the parent incident. It can only be edited by the users with the admin role. |
| Known error | The incident is a known error. It has a recorded root cause and a workaround. For a child incident, the Known Error field is automatically filled in with the value of the same field from the parent incident. It can only be edited by the users with the admin role. |
| Related service request | The incident is related to the service request specified. |
| Related event | The incident is related to the event specified. |
Create an incident task
If solving an incident requires participation of various departments, you can create an incident task for each of them. They will be related to the parent incident, but not like in the parent-child model.
To create an incident task, complete the following steps:
- Open the incident you want to create a task for.
- In the Related Lists area, select the Tasks tab.
- Click New and fill in the fields.
- Click Save or Save and exit to apply the changes.
You can create as many incident tasks as you need. The created tasks are displayed in the Tasks related list on the incident form, where you can process them in bulk, as well as in the Incident Tasks (itsm_incident_task) table.
Incident Tasks form fields
| Field | Mandatory | Description |
|---|---|---|
| Number | Y | This field contains an incident task number in INTXXXXXXX format and is populated automatically. |
| Parent | Y | This field is populated automatically with the number of the parent incident. |
| Subject | Y | Add a short description for the task. |
| Description | N | Add a detailed description for the task. |
| Followers list | N | Specify the users to receive notifications, when:
The users will not receive notifications when a user Follows or Unfollows the record on their own using a corresponding UI action on the form. The field is read-only when the record is in the Canceled or Closed state. |
| State | Y | This field is populated automatically. Available options:
|
| Assignment group | Y/N | Select a group to assign the task to. When an incident has been assigned to a group, the Assigned user field becomes non-mandatory. There is a dependency between the Assigned user and Assignment group fields. See Auto Assignment to learn more. |
| Assigned user | Y/N | Select an agent to assign the task to. When an incident has been assigned to a user, the Assignment group field becomes non-mandatory. There is a dependency between the Assigned user and Assignment group fields. See Auto Assignment to learn more. |
Notes tab
| Field | Mandatory | Description |
|---|---|---|
| Work notes | N | Add work notes. The field becomes mandatory when:
|
The Follow / Unfollow UI actions are available on the form. If you click Follow, you will be added to the Followers list and start receiving notifications. If you click Unfollow, you will stop receiving notifications about the changes in the record.
Access to the form fields
The read or update access to certain fields of a record can vary depending on the current user's roles.
- The users with the ITSM_agent or incident_manager roles, other than the creator of the incident task or the assigned user, can:
- View the record.
- Submit Work notes in all states of the incident task other than Closed.
- Edit the State, Assignment group, and Assigned user field values in all states of the task. The Work notes field becomes mandatory in this case.
- Edit the Followers list field value.
- The caller can:
- View the record, except for the Work notes field.
Incident task state model

Process multiple incident tasks
You can process multiple incident tasks at once by assigning them to a user or a group, completing them, and adding a comment. These actions are available if the incident is in any state except Closed.
The maximum number of tasks that can be processed at once is specified in the following system properties:
- itsm.mass_processing.max_number_to_assign for assigning tasks;
- itsm.mass_processing.max_number_to_complete for completing tasks;
- itsm.mass_processing.max_number_to_comment for commenting on tasks.
If you attempt to process more tasks than is allowed, an error will be displayed, and the action will not be initiated.
To process multiple incident tasks at once, complete the following steps:
-
Navigate to Incident Management → All Incidents and open the incident whose tasks you need to process.
-
Scroll down to the Related Lists area.
-
Open the Tasks tab.
-
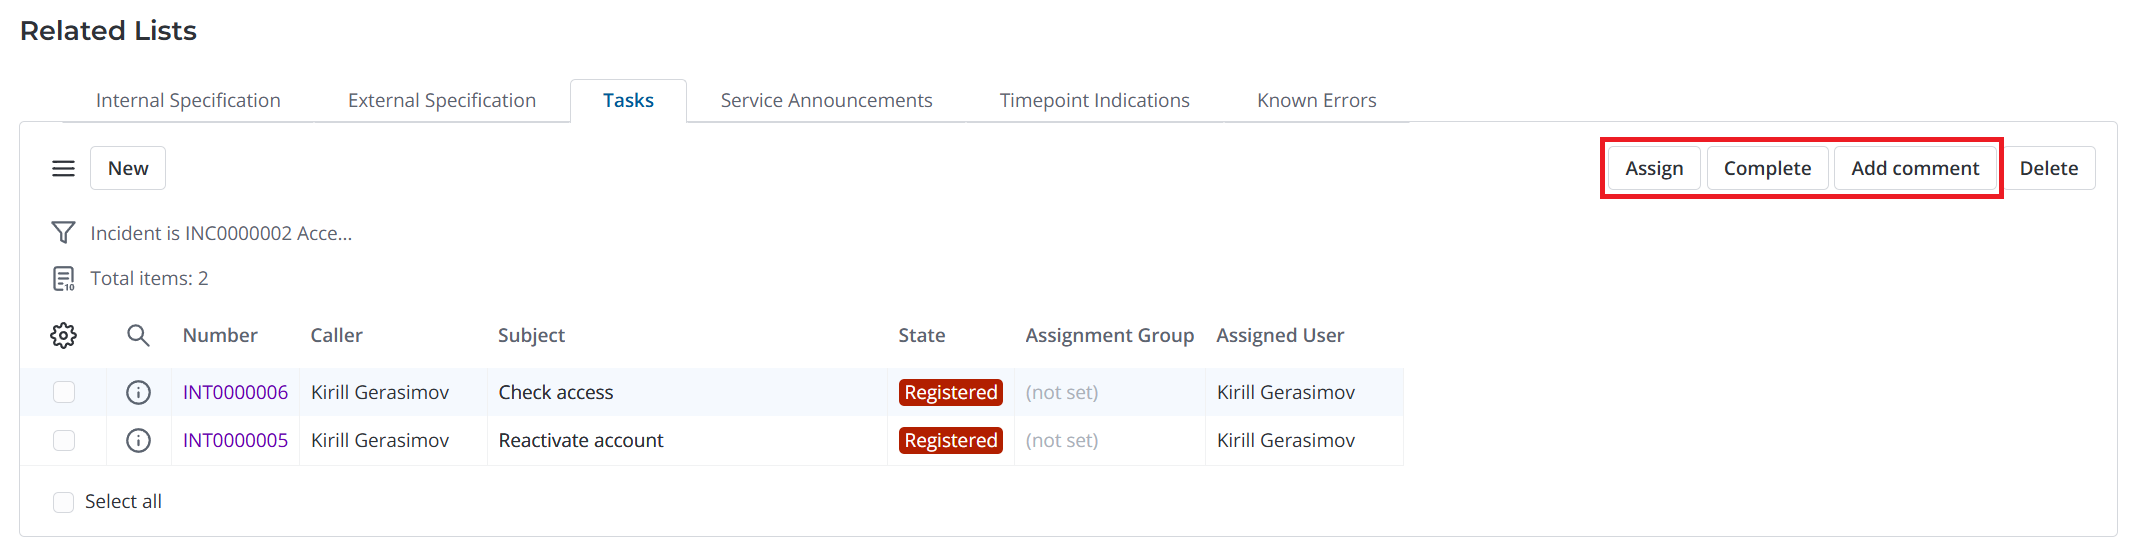
Select the checkboxes next to the tasks you need to process.
-
In the upper-right corner of the tab, click the appropriate button: Assign, Complete, or Add comment.
-
In the corresponding modal window that opens, fill in the fields and click the confirmation button.
- When assigning multiple tasks, specify the Assignment group and the Assigned user. If you fill in one of these fields, the other will become non-mandatory. You can also add a Work note by activating the Add comment toggle.
- When completing and commenting on multiple tasks, add a Work note if needed.
As a result, the values you specified in the modal window will be automatically added to the corresponding fields of the selected incident tasks. If you complete multiple tasks, each will move to the Completed state.
When completing multiple tasks at once, if their Assigned user field is empty, it is filled in with the user performing the completion.
If this user belongs to the Assignment group specified in the tasks, this field's value does not change. If this user does not belong to the specified group, the Assignment group field value changes to the Primary group of the user. If the user does not have a Primary group, the Assignment group field is cleared.
Create an incident announcement
You can create an announcement to inform affected users that the incident is being processed. To do so, complete the following steps:
- Navigate to Incident Management → All Incidents.
- Click Create announcement in the upper-right corner of the form.
- Fill in the announcement fields.
- Click Save or Save and exit to apply the changes.
You can create as many announcements as you need.
As a result, a new announcement is created in the Service Announcement (announcement) table. It has the reference to the related incident. The announcement record is also displayed in the Service Announcements related list on the incident form.