UI Actions
User interface (UI) actions are buttons, links, and context menu items on forms and lists. They allow you to customize the UI to be more interactive, adjustable, and comfortable for working.
Role required: admin.
UI action types
- On forms:
- Header left
- Header right
- Burger menu
- Field label context menu
- Link
- Bottom
- On lists:
- Header left
- Header right
- Burger menu
- Kebab menu
- Column header context menu
- Row context menu
- Link
- Bottom
- Other:
- Button context menu
- Dependency map context menu
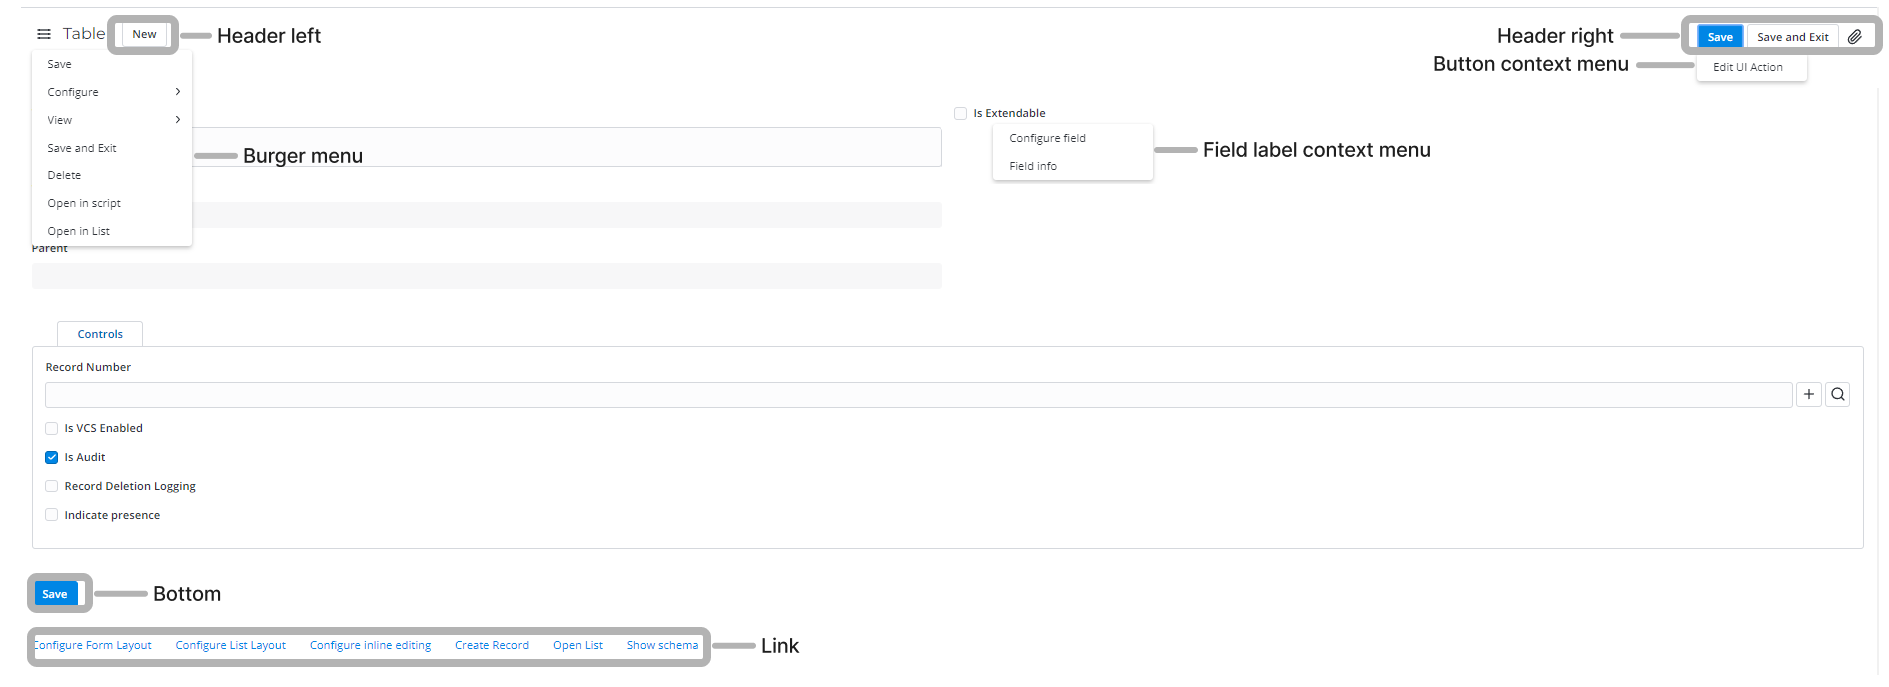
UI actions on form
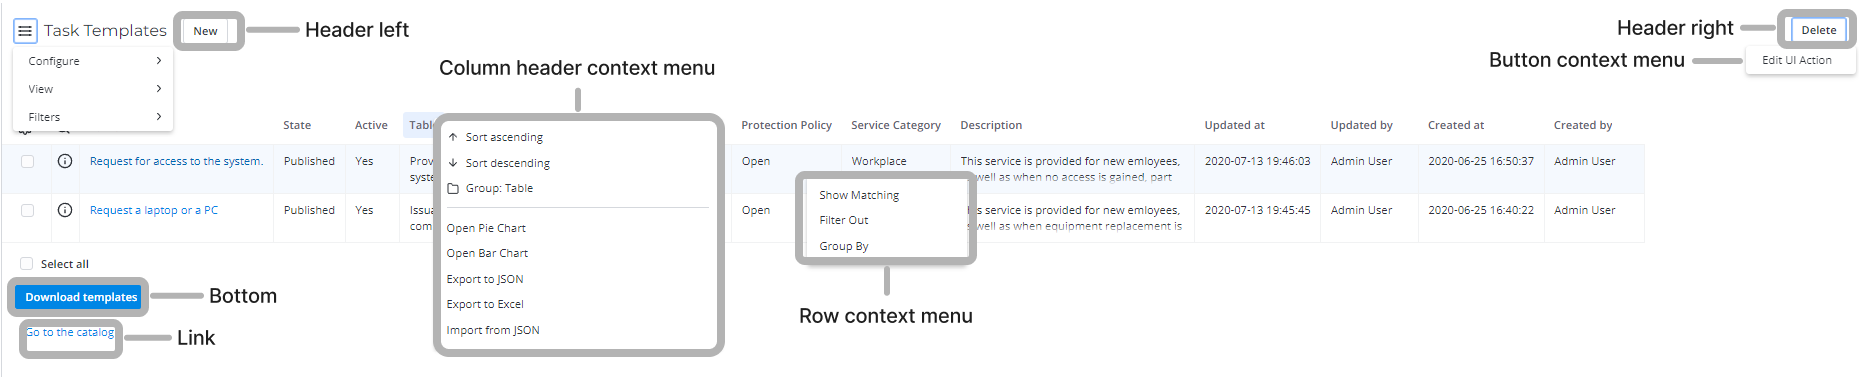
UI actions on list
Customize a UI action
You can create new or customize existing UI actions.
To do so, complete the following steps:
- Navigate to System Settings → UI Actions.
- Click New or select an existing UI action.
- Customize UI action using the form provided.
- Click Save or Save and exit to apply the changes.
UI Action form fields
- General
- Conditions and Actions
- On Form
- On List
- Other Placement
| Field | Mandatory | Description |
|---|---|---|
| Name | Y | Specify a UI action name. This text is displayed on the button, link, or as a context menu item. |
| Table | Y | Specify a table to display UI action on. |
| Parent | N | Specify the context menu item to be a parent for the current UI action (applicable for the Burger menu UI action type). |
| Comments | N | Add a brief description of the action. |
| Active | N | Select this checkbox to display the UI action on the form (list, context menu). |
| Inherited | N | Select this checkbox to make this UI action available for all child tables of the table specified in the Table field. |
| Order | N | Specify the order of the displaying. If there are UI actions of the same type, they are arranged in the ascending order. |
| Overrides | N | Specify a UI action that will be overridden by the current UI action. Learn more about UI action inheritance and override. |
| Field | Mandatory | Description |
|---|---|---|
| Show on creation | N | Select this checkbox to display this UI action on a new record form. |
| Show on update | N | Select this checkbox to display this UI action on an existing record form. |
| Wait for server response | N | Select this checkbox to specify that the system should wait for the server response after the button is clicked. All the buttons with this setting on the page become inactive until the server responds. |
| Client | N | Select this checkbox to specify that this UI action is only performed on the client side (in the user's browser). |
| Condition | N | Specify a condition using server-side API. If this condition is met, then the action is displayed on the page. |
| Script | N | Specify a script that is executed by clicking the UI action. |
| URL | N | Specify a URL the user will be redirected to after clicking the UI action. You can use the variables listed below:
|
| Field | Mandatory | Description |
|---|---|---|
| Burger menu | N | Select the checkbox to display the action as a context menu item on the form. |
| Header left | N | Select the checkbox to display the action as a button in the form header on the left. |
| Header right | N | Select the checkbox to display the action as a button in the form header on the right. |
| Field label context menu | N | Select the checkbox to display the action as an item of the context menu for the fields on the form. |
| Link | N | Select the checkbox to display the action as a link on the form. |
| Bottom | N | Select the checkbox to display the action as a button at the bottom of the form. |
| Button style | N | Select the style of buttons on the form view. Available options:
The field is available when the Header left, Header right, or Bottom checkbox is selected. |
| Field | Mandatory | Description |
|---|---|---|
| List | N | Select the checkbox to display the UI action in regular lists. |
| Related list | N | Select the checkbox to display the UI action in related lists. |
| SimpleTag "recordList" | N | Select the checkbox to display the UI action in the instances of the recordList SimpleTag. |
| Burger menu | N | Select the checkbox to display the action as a context menu item on lists. The field is available if the List, Related list, or SimpleTag "recordList" checkbox is selected. |
| Header left | N | Select the checkbox to display the action as a button in the list header on the left. The field is available if the List, Related list, or SimpleTag "recordList" checkbox is selected. |
| Header right | N | Select the checkbox to display the action as a button in the list header on the right. The field is available if the List, Related list, or SimpleTag "recordList" checkbox is selected. |
| Kebab menu | N | Select the checkbox to display the action as an item in the list header kebab menu on low resolution devices. The field is available if the List, Related list, or SimpleTag "recordList" checkbox is selected. |
| Column header context menu | N | Select the checkbox to display the action as an item in the context menu of the list column header. The field is available if the List, Related list, or SimpleTag "recordList" checkbox is selected. |
| Row context menu | N | Select the checkbox to display the action as an item in the context menu for the fields on the list. The field is available if the List, Related list, or SimpleTag "recordList" checkbox is selected. |
| Link | N | Select the checkbox to display the action as a link on the list. The field is available if the List or Related list checkbox is selected. |
| Bottom | N | Select the checkbox to display the action as a button at the bottom of the list. The field is available if the List or Related list checkbox is selected. |
| Button style | N | Select the style of buttons on the list view. Available options:
The field is available when the Header left, Header right, or Bottom checkbox is selected. |
| Reference field type | N | Select this checkbox to place the action in the related list of a Reference type field. The field is available if the Related list checkbox is selected. |
| List field type | N | Select this checkbox to place the action in the related list of a List type field. The field is available if the Related list checkbox is selected. |
| Document ID field type | N | Select this checkbox to place the action in the related list of a Document ID type field. The field is available if the Related list checkbox is selected. |
| Scripted list | N | Select this checkbox to place the action in scripted related lists. The field is available if the Related list checkbox is selected. |
| M2M type | N | Select this checkbox to place the action in the M2M type related lists. The field is available if the Related list checkbox is selected. |
| Field | Mandatory | Description |
|---|---|---|
| Button context menu | N | Select the checkbox to display the action as a context menu item for UI actions of the button type. |
| Dependency map context menu | N | Select the checkbox to display the action as a menu item on service model forms. |
You can edit some types of the UI actions like buttons and links in a quick way. To do so, complete the steps below:
- Right-click the UI action you need to edit to open its context menu.
- Click Edit UI action. The UI action form appears.

Global UI actions
You can make a UI action displayed on all tables.
To do so, follow the steps below:
- Open the UI action record you need to add to all tables.
- On the form, specify the Global table in the Table field.
- Click Save or Save and exit to apply the changes.
Most burger menu items and some buttons on the forms (New, Save, Save and exit) and lists (New, Delete) are global.
Nested UI actions
The UI action functionality allows you to create multi-level burger menus on forms and lists.
This option is only available for the UI actions of the Burger menu type.
To create a nested UI action, follow the steps below:
- Create a parent UI action, specify its type with the Burger menu checkbox in the On Form or On List tab.
- Click Save and exit to leave the form.
- Create a child UI action of the same type and specify the UI action created before in its Parent field.
- (optional) Select the Inherited checkbox to enable the UI action on the child tables.
- Click Save to apply the changes.
Display condition configuration
The condition option defines the situations when UI actions are displayed. By default, this field supports the server-side API. Select the Client checkbox to switch the available API to the client-side API. In the Condition field, use the current object of the record to access a UI action. This object can only be used for the UI actions that are displayed on forms.
Call the current object within the UI actions during the update since this object is defined. When creating a new UI action, the current value is NULL.
Use logical operators && (AND) and || (OR) to compose the complex conditions.
Use conditions to call the created Script Include on the server-side. In the example below, the function wfContextExists() of Script Include with the same name gets current.sys_id and current.getTableName as recordID and tableName arguments.
Use the ss object to call the SimpleSystem methods.
This UI action is a reference to the record with the ID of the getTableName table. If a record exists, the function returns true, and it returns false when there is no record found. Depending on the value returned, the function displays the UI action or not.
function wfContextExists(recordID, tableName){
  const table = new SimpleRecord('sys_db_table');
  table.get('name', tableName);
  const wfContext = new SimpleRecord('wf_context');
  wfContext.addQuery('related_record_id', ss.getDocIdByIds(table.sys_id, recordID));
  wfContext.selectAttributes('sys_id');
  wfContext.query();
  return (wfContext.getRowCount() > 0)
}
If the Related list checkbox is selected in the On List section, the parent variable is available in the condition script. This variable lets you access the form on which the related list is located. If you try accessing a field missing from the parent form, false is always returned.
Define a UI action behavior with a script
The Script field defines the UI action behavior. By default, this field supports the server-side API. Select the Client checkbox to switch the available API to the client-side API.
For example, this UI action adds an informational message with the Description field content:
ss.addInfoMessage(current.description);
When the current object is called, it is not necessary to use the initialize() method; the object context is already initiated.
Access the form from the related list UI action script
When you place a UI action in a related list (the Related list checkbox is selected), you can access the object of the record on whose form the related list is located. The way of access varies depending on whether the server or client API is used:
-
In server scripts (the Client checkbox is cleared), the
parentvariable is available. The example below shows a script for a button in the Menu Items related list that removes the selected menu items and makes the parent menu category inactive if it contains no items:for (var key in currents) {
currents[key].deleteRecord();
}
var record = new SimpleRecord('sys_menu_item');
record.addQuery('category_id', parent.sys_id);
record.query();
if (0 == record.getRowCount()) {
parent.active = false;
parent.update();
} -
In the client scripts (the Client checkbox is selected), the
s_formobject is available. The example below shows a script that generates a URL address for the New button in a related list. The generated URL address changes depending on the form the list is placed on:const CURRENT_RELATED_ID = s_form.getUniqueValue();
const currentTable = s_form.getTableName();
const LIST_TABLE_NAME = s_list.getTablesName()[0];
const tableName = {
crm_opportunity: 'opportunity',
crm_leads: 'lead',
crm_marketing_campaign: 'campaign',
crm_customer_company: 'company',
};
s_go.open(
`/record/${LIST_TABLE_NAME}?field_related_${tableName[currentTable]}=${CURRENT_RELATED_ID}&field_related_element_type=${tableName[currentTable]}`,
);