Work and Time Management
The purpose of Work and Time Management solution is to track the exact time employees spend on specific tasks during a certain period of time.
This solution helps managers to record start and end times for tasks and identify areas that delay completion of work.
In SimpleOne, there are two ways to create timecards:
- via the form of any object inherited from the Task (task) table.
- via the Timesheet page.
See the user documentation to learn more about writing off labor costs.
Timesheets
When an employee specifies their worktime in the Timesheet (page/wtm_timesheet) widget and submits it to approval, all of the specified data is stored in the Timesheet (wtm_timesheet) table.
Only admin users or users with the wtm_admin role can create, delete, edit, and read the Timesheet (tm_timesheet) table records.
A Timesheet record contains the following information:
- Employee
- Week start date
- Total time spent
- Time spent on [Day of the week]
Note that admin users or users with the wtm_admin role have no access to the Timesheet widget.
Approve a timesheet
When an employee clicks Submit, the timesheet is sent to the manager for approval. The following message pops up: The timesheet for {date} is submitted for approving. The states of activities change from New to Approving.
Then, the manager should approve or reject it. If they approved it, the activity states change to Approved. If it is rejected, the activity states change to Rejected.
If an employee does not have a manager, or they are a manager, timecards will be approved automatically after they click Submit. The following message appears: The timesheet for {date} was submitted successfully.
In the menu category My work, the menu item Timecards Approvals is available that leads to a list of approval tickets of employee timecards.
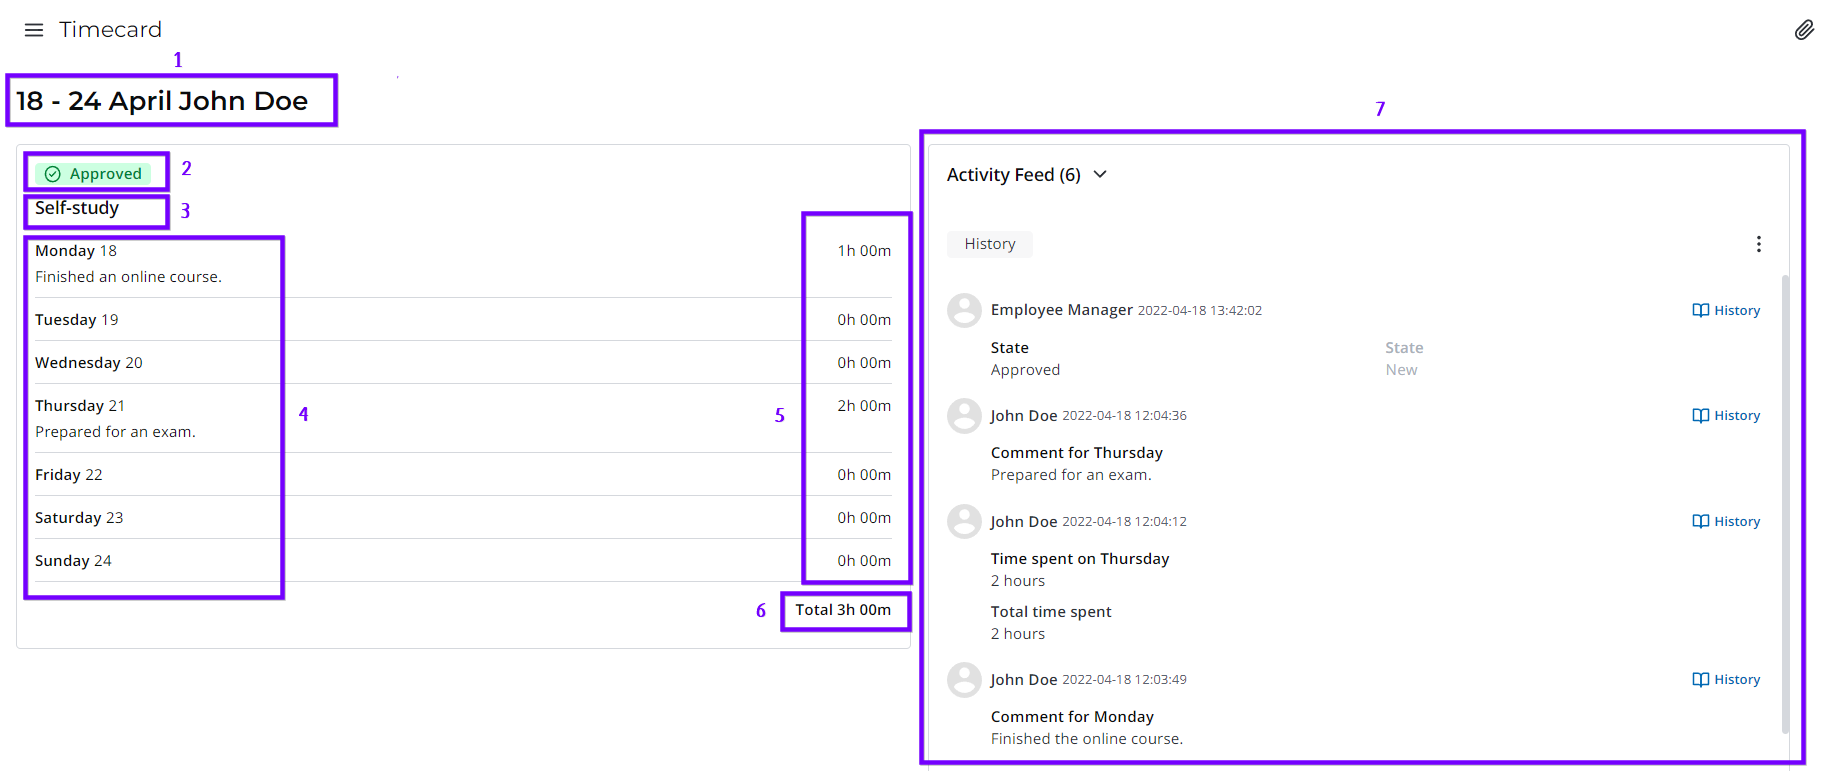
Timecards
The Timecard (wtm_timecard) table stores the information about the time spent on specific tasks during the week. Admins can read all created timecard records.
When you open any record, the form will have the following view:
- Date range of the week and the Display Name of the employee that created a timecard.
- State of the timecard.
- Activity type or name of the task and a link to task record.
- Date and days of the week with comments, if they were left.
- Time spent on the activity for each day of the week.
- Total time spent on the activity.
- Activity Feed that shows the history of field changes.
Managers can open employee timecards via the Subordinates Timecards menu item.
- In the Timecard (wtm_timecard) table, employees can only read their timecard records.
- Managers can read their personal timecards and employee timecards.
- Admins can read all created timecard records.
When a timecard is deleted from the Timesheet, all related time entry records are also deleted.
Time entries
An employee can view their time entries created for the tasks in the Time Entries (wtm_time_entry) table. Managers can view the time entry records of their subordinates. Users with the admin and wtm_admin roles can view and delete any record from this table.
To open the Time Entries (wtm_time_entry) table and view the records, navigate to the Time Entry. To create a time entry record, click Specify Time Spent on the record form. Find out more about the time entries in the Work and Time Management article.
None of the users can create time entry records from the list view of the Time Entry table or from its record form.
If you delete a record and then again click Specify Time Spent on the same task record form and add a time entry, the entries that were removed for the current week regarding the task will be created again.
When you open a time entry record, the form has the following view:
- The time entry date.
- The name of the employee who created the time entry.
- The category of the task the time entry was created for.
- A reference to the task the time entry was created for.
- The time spent for the task.
- A reference to the timecard regarding which the time entry was created.
Activities
All activities that users can select when submitting time spent on tasks are stored in the Activity (wtm_activity) table.
The following activities are included in the WTM application by default:
WTM activities
- Task
- Meeting / Assembly
- Company event
- Day off
- Training / Exam
- Self-study
- Sick leave
- Vacation
Create new activities
Role required: wtm_admin or admin.
To create a new activity, complete the following steps:
- Open the Activity table list at
{Instance URL}/list/wtm_activity. - Click New and fill in the fields.
- Click Save or Save and exit to apply changes.
Activity form fields
| Field | Mandatory | Description |
|---|---|---|
| Name | Y | Specify the activity name. It will be displayed as an option in the Activity field when submitting spent time. |
| Description | N | Add a description for the activity. |
| Active | N | Clear the checkbox to make the record inactive. An inactive activity cannot be selected when submitting the time spent but remains visible on the existing records of other tables that use this activity. |
Activity types
All activity types that users can select when submitting time spent on tasks are stored in the Activity Type (wtm_activity_type) table.
The following activity types are included in the WTM application by default:
WTM activity types
| Activity | Available types |
|---|---|
| Vacation |
|
| Sick leave |
|
| Self-study |
|
| Training / Exam |
|
| Day off |
|
| Company event |
|
| Meetings / Assembly |
|
Create new activity type
Any WTM application user can create a custom activity type.
To create a new activity type, complete the following steps:
- Navigate to Time Entry Management → Activity Types.
- Click New and fill in the fields.
- Click Save or Save and exit to apply changes.
You can also create a new activity type when filling out a timecard.
Activity Type form fields
| Field | Mandatory | Description |
|---|---|---|
| Name | Y | Specify the activity type name. It will be displayed as an option in the Activity type field when submitting spent time. |
| Activity | Y | Specify the activity the type belongs to. You can select any active record of the Activity table, escept for the out-of-the-box Task record. |
| Product | N | Specify a product to assign the time entries under this activity type to this product. |
| Active | N | Clear the checkbox to make the record inactive. An inactive activity type cannot be selected when submitting the time spent, but remains intact in the existing records. |
| Public | N | Select the checkbox to make this activity type available to all users. If the checkbox is cleared, only the record creator can use this activity type. |